Table Usage
Best practices for using tables in web content.
Table Guidelines
Tables should only be used for displaying tabular data.
What is Tabular Data?
- Any kind of data displayed in rows and columns with headings is likely tabular.
- If it would make sense to record this data in a spreadsheet, it is likely tabular.
- Unformatted data from a database is likely tabular (rows, columns, and headings).
When Not to Use Tables
- To position or create padding for page content (unless it is tabular data).
- To add background colors or images to page content.
Inserting Tables
- To insert a table, put a formatted text block element on the page and define it.
- Next, click on the down arrow next to the table icon in the menu.

- Select the number of rows and columns you want (you can always add more later).
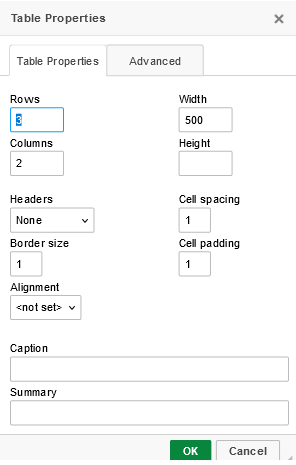
- Leave the width and height blank, and don't worry about cell spacing, padding, border size or alignment, as these are set by the web team.
- Click OK and your table will be placed in the formatted text block.
- Read below for information about headers and caption.
Creating Accessible Tables
We must keep accessibility in mind when creating tables. Tables must have the following to be accessible:
Headers
Table headers should be tagged as such, so that all users can distinguish table header rows/columns from table data cells.
When creating the table, use the Headers dropdown to specify if your table has just a first row header or a first row AND a first column header.
Caption
The table's caption can be thought of as the title of the table. Some examples:
- "Department X budget from 1990 - 2010"
- "Pricing levels for Event X"
When creating the table, put your caption in the Caption field in the table properties.
Summary
The table's summary explains the table contents, along with the basic table structure. The summary does not show up on the screen, but is read to people using screen readers. Example:
- "Full yearly budget for Department X. Horizontal headings contain years."
- "Fee structure for Event X, based on age and date. Horizontal headings contain age brackets, vertical headings contain dates."
When creating the table, put your table summary in the Summary field in the table properties.
Adding or Removing Rows & Columns
Adding or removing rows and columns is fairly simple.
Adding a Row or Column
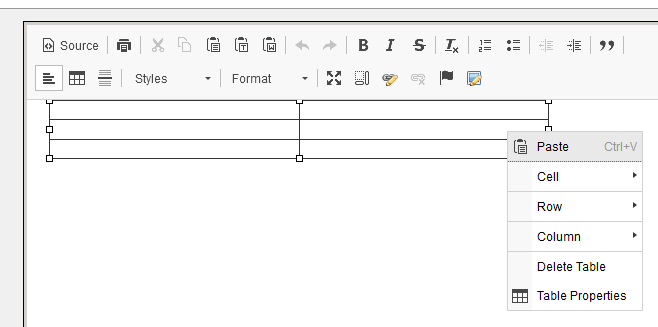
- Make sure the table has focus (click on one of the table cells).
- Right-click on a cell in a row/column adjacent to the one you want to add.
- Hover over Row or Column in the menu.
- Choose the action you would like to take (add row/column before/after this one).
Removing a Row or Column
- Make sure the table has focus (click on one of the table cells).
- Right-click on a cell in the row/column you want to remove.
- Hover over Row or Column in the menu.
- Choose the action you would like to take (Remove Column or Remove Row).
Help Us Improve This Page
Did you notice an error? Is there information that you expected to find on this page, but didn't? Let us know below, and we'll work on it.
Feedback is anonymous.